Tuesday, July 31, 2012

How To Customize Label Cloud In Blogger

1 comments Posted by Unknown On Tuesday, July 31, 2012

blogger label widget, label gadget, custom label gadget
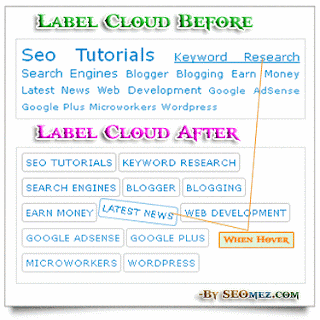
Label Cloud which is basically known as Tag Cloud is one of the very popular Google Blogger widget or gadget. It has the best powerful feature to organize your entire blog site content in a systematic way. Similarly it also gives dynamic look to your entire blog site and also definitely make grouping posts easier. Additionally, you and all novice to the blogger platform knows that Google Blogger doesn't provide any kind of designing control over this default blogger Label gadget although it definitely has the right customization. Thus, today I am posting this article especially to implement CSS3 powered design for this gadget to stylify and give it a pretty dynamic look. Well let's stop our conversation here and point towards customizing this gadget or widget by following the below listed amazing and powerful steps.

Follow below Steps to Customize the Label Cloud in Blogger:

  • Go to Blogger > Setting > Click layouts
  • Choose "Add a gadget" option and select "Label"
  • Inside the Label gadget setting choose "Cloud" as the display option and hit Save button
  • Now Go to Template > Design and backup your full template to prevent from template malfunction.
  • Now Click Edit HTML > Proceed
  • Search for ]]></b:skin> and just above it paste the following CSS3 Powered Label Cloud customization code.
/*-----Custom Labels Cloud widget by www.seomez.com----*/
.label-size a{text-transform:uppercase;float:left;text-decoration:none}
.label-size a:hover{text-decoration:none}
.label-size{float:left;font-size:10px;color:#666;text-transform:uppercase;text-decoration:none;border:solid 1px #C6C6C6;border-radius:3px;margin:0 2px 6px 0;padding:3px}
.label-size:hover{border:1px solid #6BB5FF;
text-decoration: none;
-moz-transition: all 0.5s ease-out; 
-o-transition: all 0.5s ease-out; 
-webkit-transition: all 0.5s ease-out; 
-ms-transition: all 0.5s ease-out; 
transition: all 0.5s ease-out;
-moz-transform: rotate(7deg); 
-o-transform: rotate(7deg); 
-webkit-transform: rotate(7deg); 
-ms-transform: rotate(7deg); 
transform: rotate(7deg); 
filter: progid:DXImageTransform.Microsoft.Matrix(
                    M11=0.9961946980917455, M12=-0.08715574274765817, M21=0.08715574274765817, M22=0.9961946980917455, sizingMethod='auto expand');
zoom: 1; 
}
  • That's it! Now save your template and view your blogger site.

My Conclusion:

Dear Pals, I am sure that you will gone a love this customization when you look over your label widget. Well installation of this won't create any troubles but if you face any sorts of problems and if you need helps regarding font color on active, hover and visited links then let me know through the great help of below comment wizard.

Monday, July 23, 2012

Mashable Style Social Sharing Blogger Widget

0 comments Posted by Unknown On Monday, July 23, 2012

As you all know, social media helps to generate quality backlinks and lots of readers to your websites and blogs. Additionally, for the better ranking of your site in Search Engines social media plays vital role. We all know that Mashable the enormous social media blog site is forever inspirable in whatever they perform.  When I was busy in developing some WordPress sites project, I found the great amazing WordPress plugin called Mashable Social Bar. As many Blogger users are always seeking all over the web for All-in-One Social Media Sharing Widget, so we download their plugin and make it compatible with blogger platform. This widget basically consists of Google Plus, Facebook, Twitter, Email Subscription, RSS Feed, YouTube and Pinterest. Also most importantly this widget got eye-catching subscription form that will further more help you to increase Email Subscribers. Similarly before installing this widget make sure you have pages of blog on Google Plus, Facebook, Twitter and RSS Feed powered by Feedburner. Well now let’s stop our discussion and get started to install attractive Mashable Style Social Sharing blogger widget.

Follow below Steps to add "Mashable Style Social Sharing Widget" to Blogspot Blog:

  1. Login to Blogger Dashboard > Select Design
  2. Choose "Add a Gadget" Option
  3. Pick "HTML/Javascript" Widget
  4. Now Copy and Paste the below entire codes in HTML/Javascript Widget;
    <style>
    #widgetbar{border:0;width:300px;margin:0 auto}
    .fb-likebox{background:#fff;border-right:1px solid #D8E6EB;border-left:1px solid #D8E6EB;border-bottom:1px solid #D8E6EB;height:35px;margin:0;padding:7px 13px 0 10px}
    .googleplus{background:#F5FCFE;border-bottom:1px solid #ebebeb;border-right:1px solid #D8E6EB;border-left:1px solid #D8E6EB;border-image:initial;font-size:.90em;font-family:Arial,Helvetica,sans-serif;color:#000;line-height:1px;padding:9px 11px}
    .googleplus span{color:#000;font-size:11px;position:absolute;display:inline-block;margin:9px 70px}
    .g-plusone{float:left}
    .gplus{background:#fff;border:0 solid #C7DBE2;margin-bottom:-13px;padding:0}
    .twitter{background:#EEF9FD;border:1px solid #C7DBE2;border-top:0;padding:10px}
    #email-news-subscribe .email-box{border-image:initial;border-left:1px solid #C7DBE2;border-right:1px solid #C7DBE2;border-top:0;font-family:Arial,Helvetica,sans-serif;height:35px;padding:5px 10px}#email-news-subscribe .email-box input.email{-khtml-border-radius:3px;-moz-border-radius:3px;-ms-border-radius:3px;-o-border-radius:3px;-webkit-border-radius:3px;background:#FFF;border:1px solid #dedede;border-image:initial;border-radius:3px;color:#999;font-family:Arial,Helvetica,sans-serif;padding:7px 10px 8px}
    #email-news-subscribe .email-box input.email:focus{color:#333}
    #email-news-subscribe .email-box input.subscribe{background:-moz-linear-gradient(center top,#FFCA00 0,#FF9B00 100%);background:-webkit-gradient(linear,left top,left bottom,color-stop(0,#FFCA00),color-stop(1,#FF9B00));background:-moz-linear-gradient(center top,#FFCA00 0,#FF9B00 100%);-pie-background:linear-gradient(270deg,#ffca00,#ff9b00);font-family:"Arial","Helvetica",sans-serif;border-radius:3px;-moz-border-radius:3px;-webkit-border-radius:3px;border:1px solid #cc7c00;color:white;text-shadow:#d08d00 1px 1px 0;padding:7px 14px;margin-left:3px;font-weight:bold;font-size:12px;cursor:pointer;border-image:initial}
    #email-news-subscribe .email-box input.subscribe:hover{background: #ff9b00;background-image:-moz-linear-gradient(top,#ffda4d,#ff9b00);background-image:-webkit-gradient(linear,left top,left bottom,from(#ffda4d),to(#ff9b00));filter:progid:DXImageTransform.Microsoft.Gradient(startColorStr=#ffffff,endColorStr=#ebebeb);outline:0;-moz-box-shadow:0 0 3px #999;-webkit-box-shadow:0 0 3px #999;box-shadow:0 0 3px #999;background:-webkit-gradient(linear,left top,left bottom,color-stop(0,#ffda4d),color-stop(1,#ff9b00));background:-moz-linear-gradient(center top,#ffda4d 0,#ff9b00 100%);-pie-background:linear-gradient(270deg,#ffda4d,#ff9b00);border-radius:3px;-moz-border-radius:3px;-webkit-border-radius:3px;border:1px solid #cc7c00;color:#FFFFFF;text-shadow:#d08d00 1px 1px 0}
    #icon-social-bar{background-color:#D8E6EB;box-shadow:0 1px 1px #FFF inset;font-family:Arial,Helvetica,sans-serif;font-weight:700;overflow:hidden;border:1px solid #B6D0DA;height:45px;padding:0}
    #icon-social-bar .icon-follow{float:left;color:#1E598E;overflow:hidden;height:20px;width:270px;padding:0px;padding-left:15px}
    #icon-social-bar .icon-follow li.rss{background:url(https://lh4.googleusercontent.com/-dH0VPhFw48Y/UAyh68dnqZI/AAAAAAAAAKE/mqiiZ4mWONQ/s16/RSS.png) no-repeat transparent;line-height:1;width:60px;margin-left:20px;margin-bottom:0;padding:0 3px 1px 20px}
    #icon-social-bar .icon-follow li.youtube{background:url(https://lh6.googleusercontent.com/-DEnbJ4a72wQ/UAyh6_S9-_I/AAAAAAAAAKE/wmUVDCsfmLQ/s16/YouTube.png) no-repeat transparent;line-height:1;width:60px;margin-bottom:0;padding:0 3px 1px 20px}
    #icon-social-bar .icon-follow li.pinterest{background:url(https://lh3.googleusercontent.com/-YMMayPwRZf0/UAzZ4WMgvLI/AAAAAAAAAKk/QD8R6EaVxZM/s16/Pinterest.png) no-repeat transparent;line-height:1;width:60px;margin-bottom:0;padding:0 3px 1px 20px}
    #icon-social-bar .icon-follow li.rss a,#icon-social-bar .icon-follow li.youtube a,#icon-social-bar .icon-follow li.pinterest a{text-decoration:none}
    #icon-social-bar .icon-follow li.rss a:hover,#icon-social-bar .icon-follow li.youtube a:hover,#icon-social-bar .icon-follow li.pinterest a:hover{text-decoration:underline}
    #icon-social-bar ul,#icon-social-bar .icon-follow ul{list-style:none outside none;padding-left:4px}
    #icon-social-bar .icon-follow ul li,#icon-social-bar .icon-follow li{font-size:12px;font-weight:700;display:inline;border:0;text-shadow:1px 1px #FFF}
    #icon-social-bar .icon-follow ul li a,#icon-social-bar .icon-follow li a{font-size:12px;color:#1E598E;font-weight:700;display:inline;text-shadow:1px 1px #FFF}
    #seomez{background:#EBEBEB;border:1px solid #CCC;border-top:1px solid #FFF;text-align:right;border-image:initial;padding:2px 8px 2px 3px}
    #seomez .author-credit a{font-size:10px;font-weight:700;text-shadow:1px 1px #FFF;color:#1E598E;text-decoration:none}
    </style>
    <!--[if IE]>
    <style>
    #email-news-subscribe .email-box input.subscribe{background:#FFCA00}
    </style>
    <![endif]-->
    <!--Start of SEOmez Subscription widget-->
    <div style="margin-bottom:10px;">
    <div id="widgetbar" >
    <div class="gplus">
    <link href="https://plus.google.com/110685936615491600600" rel="publisher" />
    <script type="text/javascript">window.___gcfg = {lang: 'en'}; undefinedfunctionundefined) {var po = document.createElementundefined"script"); po.type = "text/javascript"; po.async = true;po.src = "https://apis.google.com/js/plusone.js"; var s = document.getElementsByTagNameundefined"script")[0]; s.parentNode.insertBeforeundefinedpo, s); })undefined);</script>
    <script type="text/javascript">var _gaq = _gaq || []; _gaq.pushundefined['_setAccount', 'UA-32700052-1']); _gaq.pushundefined['_trackPageview']); undefinedfunctionundefined) { var ga = document.createElementundefined'script'); ga.type = 'text/javascript'; ga.async = true; ga.src = undefined'https:' == document.location.protocol ? 'https://ssl' : 'http://www') + '.google-analytics.com/ga.js'; var s = document.getElementsByTagNameundefined'script')[0]; s.parentNode.insertBeforeundefinedga, s); })undefined);</script>
    <g:plus href="https://plus.google.com/110685936615491600600" width="300" height="131" margin="0px" theme="light"></g:plus> </div>
    <div class="fb-likebox"><iframe src="//www.facebook.com/plugins/like.php?href=http%3A%2F%2Fwww.facebook.com%2Fusernaame&amp;send=false&amp;layout=standard&amp;width=290&amp;show_faces=false&amp;action=like&amp;colorscheme=light&amp;font=arial&amp;height=35&amp;appId=411176802268007" scrolling="no" frameborder="0" style="border:none; overflow:hidden; width:290px; height:35px;" allowtransparency="true"></iframe></div>
    <div class="googleplus"><span>Recommend us on Google!</span><div class="g-plusone" data-size="medium"></div> <script type="text/javascript" src="https://apis.google.com/js/plusone.js"></script> </div>
    <div class="twitter"><iframe title="" style="width: 300px; height: 20px;" class="twitter-follow-button" src="http://platform.twitter.com/widgets/follow_button.html#_=1319978796351&amp; align=&amp;button=blue&amp;id=twitter_tweet_button_0&amp; lang=en&amp;link_color=&amp;screen_name=twittername&amp;show_count=&amp; show_screen_name=&amp;text_color=" frameborder="0" scrolling="no"></iframe> </div>
    <div id="email-news-subscribe"><div class="email-box"><form action="http://feedburner.google.com/fb/a/mailverify" method="post" target="popupwindow" onsubmit="window.openundefined'http://feedburner.google.com/fb/a/mailverify?uri=feedburnertitle', 'popupwindow', 'scrollbars=yes,width=550,height=520');return true"><input class="email" type="text" style="width: 150px; font-size: 12px;" id="email" name="email" value="Enter Your Email here.." onfocus="ifundefinedthis.value==this.defaultValue)this.value=&#39;&#39;;" onblur="ifundefinedthis.value==&#39;&#39;)this.value=this.defaultValue;" /><input type="hidden" value="seomez" name="uri" /><input type="hidden" name="loc" value="en_US" /><input class="subscribe" name="commit" type="submit" value="Subscribe" /></form></div></div>
    <div id="icon-social-bar">
    <ul class="icon-follow">
    <li class="rss"><a href='http://feeds.feedburner.com/feedburnertitle' rel='nofollow' target='_blank' title='RSS Feed'>RSS Feed</a></li>
    <li class="youtube"><a href='http://www.youtube.com/user/youtubename' rel='nofollow' target='_blank' title='YouTube'>YouTube</a></li>
    <li class="pinterest"><a href='http://pinterest.com/pinterestname' rel='nofollow' target='_blank' title='pinterest'>Pinterest</a></li></ul>
    </div>
    <div id="seomez" style="background: #EBEBEB;border: 1px solid #CCC;border-top: 1px solid white;padding: 1px 8px 1px 3px;text-align: right;border-image: initial;font-size:10px;font-family: "arial","helvetica",sans-serif;"> <span class="author-credit" style="font-family: Arial, Helvetica, sans-serif;"><a href="http://www.seomez.com/2012/07/mashable-style-social-sharing-blogger.html" target="_blank" >Get this Widgets »</a></span></div></div></div>
    <!--End of SEOmez Subscription widget-->
    
    Now make these below important changes in the above codes:
    • Replace https://plus.google.com/110685936615491600600 with your Google Plus Page
    • Replace username with your Facebook Username
    • Replace twitternamewith Twitter Username
    • Replace feedburnertitle with Feedburner Title
    • Replace youtubename with YouTube Username
    • Replace pinterestname with Pinterest Username 
         5. Now Search for ]]></b:skin> in your template code and just below paste this code
    <script src='http://apis.google.com/js/plusone.js' type='text/javascript'/>
    
         6. Now Save your widget and enjoy the Mashable Style Social Plugin !

    Conclusion:

    This Social widget is basically for sidebar having width 300px or more. For any sorts of customization solution or if it doesn't work just leave comment pals..!

    Sunday, July 22, 2012

    Create Desired Username For Google plus URL

    1 comments Posted by Unknown On Sunday, July 22, 2012

    Google Plus, GPlus.to
    Especially for bloggers and webmasters Google Plus has now become very much popular Social Media. Also this social network site is great in scores of respects. But Google plus has one very imperfection which even novice or newcomers to this social network can detect. This imperfection is that Google plus won’t carry personalized profile URL like in Facebook and Twitter. Your Google Plus Pages and Profiles URL looks like http://plus.google.com/123.. instead of http://plus.google.com/username. So due to involve of long number in your Google Plus Page or Profile URL, it becomes hard to memorize. Thus considering this theme in my mind I have written this article to guide you to solve this issue by using a great web application called GPlus. GPlus is one of the great URL shortening service for Google Plus. By using this GPlus you will be able to get a personalized username for your Google Plus Page or profile URL in the form of http://gplus.to/username. Additionally, you should always remember that GPlus is a URL shortening service for Google Plus and won’t change your actual Google Plus Page or Profile URL. Rather it will just provide redirect link which will open Google Plus Page or Profile. Well let’s stop discussing here and follow the below guidelines to built a desired username for Google Plus Page or Profile URL.

    Steps to Customize Google Plus URL:

    • In a very first step you have to fetch your Google Plus Profile or Page ID. For "Google Plus Profile"; Log in to Google Plus account > Click drop-down arrow located near your profile image at top-right and Select View Profile. But for "Google Plus Page" Select your desired Google page instead of View profile. Now you will view ID in your browser's address bar. Just select and copy that ID as shown in below image.
    • GPlus ID, Google plus
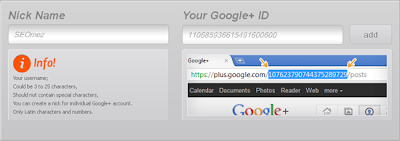
    • Now Go to GPlus.In the field of Nick Name field input the desired "Username" and in the field of Your Google+ ID simply paste that copied ID in the step:1 and Click add button. But note that Nick Name field only supports numbers and alphabets ranging from 3 to 25 characters and won't support any special characters including Latin Characters. If you have any doubts then look at the below image.
    • Gplus.to, Google Plus Username
    • Once you Click Add, GPlus will notify ID like http://gplus.to/username. That's it, you can now use this link to redirect your Google Plus Profile or page by simply using this link in your browser's address bar. But remember that if your ID is incorrect that you will not get link and further more if you have generated this ID once than GPlus will notify that your nickname is used by someone else.

    Conclusion:

    This service is recently started and is really amazing. Already millions of profiles and pages have been upadated too. So dear pals claim it as fast as possible. Also if you find this post impressive or have any comments then feel free to include in below comment section.
    Hope you all enjoy this awesome post !

    Thursday, July 19, 2012

    Manage Multiple Users With Single AdSense Account

    0 comments Posted by Unknown On Thursday, July 19, 2012

    Google AdSense is one of the best and awesome services provided by Google System which aids to generate some handy cash by displaying its ads on our respective Blogger and Self-Hosted Blog or Website. Nowadays Google AdSense has become the major source of income for many bloggers and webmasters. In past days, Google AdSense could only be accessed through single account which leads to drive serious problem for dedicated blogs that are operated or run by more than single person as sharing revenue earned from Google AdSense was a critical issue. So to solve this serious problem Google has just release multiple accounts integration with Google AdSense account. Hence the good news is that now you can share your main AdSense account with business partners, family members or friends. Additionally, you can also assign access level to have power over who gets what sort of rights in your main AdSense account. Well in this post we’ll mainly argue about how to give multiple access levels to people by sending invites.

    What others can access in your account?

    Before you want someone to access your account, you should send an invitation to them. Additionally, you can provide your users with either of the two access levels; Standard User or Administrator. Both of these users can view, edit or manage any part of that account but below are two main differences among them:
    • Standard Users attain limited privileges and can’t view a list of users who have access to that account while Administrator can.
    • Administrators attain all privileges and can give account access and change other user’s access level while Standard Users can’t.

    How to invite others to your account?

    Before processing this step you should remember that for someone to access your account, they need to have Google Account without AdSense feature enable as people who already have Google AdSense account of their own can’t access other accounts. Now follow the below steps guide to invite a user to your account to simply access your AdSense account:
    • At a very first step Sign into your Google AdSense account (not Google account)
    • Now under your Home Tab, open up Account Setting through the left panel
    • Go to Access and authorization and fill up Users with Sign in access with email addresses. Now simply click on Invite. The user will be added when they accept your invite. Also bear in mind that this Users with sign in access section will list all the users that have access to your account.
    Note: Similarly from that section you also can change access level for any user. By default all of your users will be standard until you check that Administrator box. Remember checking this Administrator box for a user will provide those Administrator privileges and unticking this box will definitely lead to reduce their privileges.

    How to revoke others to your account?

    For stopping some users from accessing your Google AdSense account, simply follow the below guidelines:
    •  At a very first step Sign into your Google AdSense account (not Google account)
    • Now under your Home Tab, open up Account Setting through the left panel
    • Go to Access and authorization and you will see a cross (X) button next to each user. Click on this cross to remove specific user. By doing so that user will receive notification via email too.
    It’s very good to see that Google is being pretty active and busy too in recent days. And additionally, I hope Google will deliver more such integration options for other services also. Hence always stay tuned for such updates!

    Thursday, June 28, 2012

    Microworkers Forum Posting Jobs Secret Solution

    49 comments Posted by Unknown On Thursday, June 28, 2012

    Microworkers
    In this modern internet era nobody works and performs anything without benefits. As you all know many of the people and internet market personnel are always seeking to generate money online using genuine and legit online earning sites like Microworkers. Microworkers is one of the greatest legit and innovative online earning platform that links both Employers and Workers through out the Internet world. This innovative site is completely dedicated to provide micro-freelancing jobs or tasks to their users through which they can generate income online and live a wealthy life. Also this type of micro-freelancing jobs are most easier to perform. Similarly, each and every tasks provided by microworkers covers certain time to perform according to their nature. Mostly microworkers provides different tasks or jobs like Sign-Up, Clicks/Search, Bookmark, Voting, Yahoo-Answer, Forum Posting, Tweeting, Facebook Like and many more which are easy to handle and are also interesting to perform. Additionally you will be provided this kinds of job platform with general hints which you should follow seriously to get payment by performing that predefined task. Among many jobs available to you from microworkers, forum posting is one of the great job. Which pays highest rate of earning as comparing to other simple jobs like Sign-Up, Click-search, Bookmarks, Voting, etc. Well now without discussing anymore about microworkers job platforms, let’s deal to touch briefly about how to earn money from microworkers by performing basically Forum Posting Job available to you. Thus considering this theme in my mind, I personally use and suggest you all to use below listed forums to perform Forum Posting Jobs in a very first step:

    Get Prepared By Joining Below Few Forums:

    Note: Dear pals bear in mind that above listed Twenty Forums are perfect in my sense and I mostly prefer them. Additionally, there are many more forums that are related to your niche or topic. Thus you can further more find different forums to participate by using below awesome Forum Search Engines:
    Also if you want hundred list of forums to work with microworkers forum jobs and further more for promoting your website and blog then surf  my great article "Awesome Forum List You Ever Need"

    Procedure to do Microworkers Cheetah Forum Jobs:

    Let me tell you something that if you successfully completed any of the Cheetah Forum Posting Jobs available to you in Microworkers, then you can earn approximately 0.20$ easily. But the true fact is that many newbies over Microworkers don't have an ideas of doing Cheetah Forum Jobs. Thus considering mostly for newbies, I personally have dedicated my effort to list the suitable step by step procedure below to handle Microworkers Forum Jobs:
    • Log In to Microworkers and open any of the Forum Post Jobs available in your Job Section. Now you will see a link like "http://cheetuh.com/b/prQwf8E-7deb4b6e". Again open this link available while doing Forum Job in your browser's New Tab.
    • Now you are able to view Keyword or Anchor Text, a link and a box to submit Forum Post link.
    • Open any of the best forum regarding to the Keyword in anchor text and post an article of about 30 words which describes the link contained inside "http://cheetuh.com/b/prQwf8E-7deb4b6e". While writing a post provide the link in the middle of the paragraph with that anchor text provided to you. I strongly recommend you not to put the link either at the beginning of the paragraph neither the end of the paragraph.
    •  Now "Submit the Post" and Copy the "URL Link to your Forum Post".
    • Again go to the opening browser tab of "http://cheetuh.com/b/prQwf8E-7deb4b6e" and submit the link inside the "Forum Post URL" box.
    • Congrats! Now you will receive "7-digit Conformation Code". But bear in mind that if your task is not well performed than you won't get this type of code. Now for proof you have to copy it if you get that code..
    • At last, accept that Job and Paste that "7-digit Conformation Code" inside proof box and Click "I confirm that I have completed this task"!
    I hope now you all can complete the Forum Jobs available to you in Microworkers Job panel without facing any sorts of problems. Get ready to grab the opportunity to earn money through Microworkers by performing Forum Jobs. Well now for any suggestions and problems regarding Microworkers Forum Jobs leave comments. Also if you have best forums suggestions rather than above listed, please share it with our community!
    "Our Community wants to be Together and Works Together!"

    Friday, June 22, 2012

    Is Keyword Denity Rocket Science to Rank?

    3 comments Posted by Unknown On Friday, June 22, 2012

    Keword Density
    Keyword density refers to the percentage of certain keyword used within an article or content of your website or blog for better On-Page SEO. Also it is one of the major factor among other Keyword Factors. For instance, if you have created a site about "Laptop Repairing" and wrote an article about article about 250 word count on "How to repair Laptop?" by including the word "Laptop" for almost 12 times. This means that your article has gain the specific keyword density range 12 divided by 250 times 100, or about 4.8%. Nowadays specific keyword density has become very important and controversial as many webmasters and SEO experts thinks that Search Engines use them to rank and promote your website or blog in their SERP. The main reason behind it is that keyword density has carry historical value for organic Search Engine Ranking. This reason is partly true. But the real fact is that, today's advanced Search Engines uses latest advanced technology called LSI (Latest Semantic Indexing) and gives less importance to keyword density inside the web contents. Due to the use of advanced LSI technology, Search Engines today's can easily understand the meaning of a website contents even if the keyword are not exactly present there. Also they really knows better  about synonyms and can easily extract the keyword from meaning of the text included in contents. Thus they always prefers to rank unique contents in their SERP. Well without discussing anymore, let's deal to touch briefly about keyword density worth value or not to make your site contents Search Engine friendly.
              Although I've said in the above paragraph that today's Search Engines are based on LSI technology so keyword density worth no value for for ranking your website or blog. But it doesn't meant that you should stop using keyword inside your contents for better SEO. Further more keyword are also very much important because if Search Engines could not find any keyword in your contents then how could they index and rank your site in their SERP database. This means that you should not exceed the keyword limit inside your contents to increase specific keyword density range for the purpose to make your content Search Engine friendly by gaining higher position in SERP. Majorly Google along with other Search Engines are always seeking for 3% to 7% of specific keyword density range in your website or blog contents. But when googlebot or web-spider came crawling over your content and found specific keyword density ranging above 20% then Search Engines turn your content into over hyped gobbled ygook and your site will be penalize by moving down in the search results because Search Engines recognize this type of contents as "Keyword Stuffing".

    My Advice:

              Keyword density are really not the rocket science and are also not the best indicator to rank you website, so don't fall into trap of increasing keyword limit into your contents. You should always bear in mind that content is for humans as well as Search Engines so forcing keyword inside your content can devalue it. While writing content you shouldn't think about keyword density because it leads to increase keyword more than you need. Thus you should write naturally for targeted audience first and then review then review the content to make sure that the keyword is present at least a little bit.

    Thursday, June 21, 2012

    How Keyword Factor Affect Search Engine Rankings?

    3 comments Posted by Unknown On Thursday, June 21, 2012

    Ranking Keyword Factor
    When I made a surf over different internet websites and blogs which are really dedicated for better Search Engine Optimization (SEO), I discovered that many targeted audience are mostly seeking for the terms like Keyword Frequency, Keyword Density, Keyword Prominence and Keyword Proximity. This means that they really wants to know more about keyword factors that affects in Search Engine Rankings. Along with this they also really want to know about Why Keyword is important for better SEO? Although today's advanced Search Engines uses latest advanced technology called LSI (Latest Semantic Indexing) but in fact they also gives respect to the keyword within the web contents as they carries historical values. Well in this article, I will dedicate my full effort and deal to touch briefly about Keyword Frequency, Keyword Density, Keyword Prominence and Keyword Proximity along with how they affects in Search Engine Rankings.

    Keyword Frequency:

            Keyword frequency refers to the total repetition of keyword or keyword phrase within a particular website or blog content. Thus keyword frequency is also called keyword repetition. The theory is that as more times keyword repeats on your particular content, Search Engines are most likely to give more relevance to that content for a search query with those keyword. Basically be ensure that most important keyword should be repeated mostly in your entire content. Additionally, you should also bear in mind that Search Engines can penalize your website content by moving down in search results if they found excessive use of keyword because they recognize this type of contents as "Keyword Stuffing". Thus I strongly recommend you to follow keyword density rule for better keyword repetition inside your website or blog contents.

    Keyword Density:

            Keyword density refers to the ratio or percentage of certain keyword contained within the total word count of an content of your website or blog. Majorly specific keyword density range varies from Search Engines to Search Engines. Thus I strongly suggest you to use specific keyword density ranging between 3% to 7% as it is highly recommended by the greatest Search Engine Google. For further more detail about Keyword Density I suggest you to read Is Keyword Density Rocket Science to Rank?

    Keyword Prominence:

            Keyword prominence refers to the closeness between two or more keywords. It basically means to that you should place keyword as near as possible at the beginning of your sentence or paragraph. The theory is that if a keyword appears close in the sentence or paragraph, its prominence will be 100%. Thus for better Search Engine ranking I strongly recommend you to place most important keyword at the Header Tags (i.e. Title Tags and Meta Tags).

    Keyword Proximity:

            Keyword proximity is the hybrid combination of keyword density and keyword prominence. Basically, it deals to look at the location of keyword and how often keyword is being used in the sentence or paragraph. Additionally, it also takes note of the distance between two or more keywords. The theory is that to gain better Search Engine Ranking, the important keyword should appear close in starting of sentence or paragraph. For Instance, see the below examples:
    • How Keyword factors Affects Search Engine Rankings?
    • How Keyword factors Affects Rankings In Search Engine?
              From above examples, if someone searches for "search engine rankings" in Google and other search engines than web content that contains the first sentence as heading or title is most likely to rank higher than the second one. The reason behind it is that in first sentence keywords are placed close and together to maintain the near distance.

    My Suggestion:

            Overall above listed keyword factors are very much essential to gain higher position in SERP of Search Engines. But you should always remember that use of excessive keyword to rank higher can penalize your website for Keyword Spamming as Search Engines easily track this kind of technique implemented. Atlast, if you want to gain more ideas about keyword factors then you can surf this Mike's article "How Keyword Density, Frequency, Prominence And Proximity Affects Search Engine Rankings".
     

    Copyright© 2012 All Rights Reserved By SEOmez | Template by Shiva Poudel